Sunday, January 31, 2010

A taste of summer in January

Oh my fellow food lovers! I apologize for my absence for a few days. Oh that’s right, you didn’t notice. Okay, well not that you asked, but I have Plantar warts (never get them, always wear flip flops in strange showers) from one summer working the grill on Block Island and unfortunately for me, living in squalor with boys who had questionable hygiene. I got their warts (note: warts on my feet, from nasty shower conditions, not any other kind, you know. Just thought I would add that).
As they are not responding to conventional treatment, my doctor decided to be more aggressive last Monday and I have been in pain ever since. I have been staying off my feet, and am unable to do the two things I love: running and cooking. You can imagine, after a week of knitting and AM radio, I have had it! I am cranky. And as is my down fall, I look to food for some kind of pleasure (hence my weight gains over the years, but a story for another time). My favorite time of year to cook is summer. I love being outside grilling steaks or smoking a pork shoulder. I decided I needed a little summer to cheer me up. To me, nothing says summer like grilled veggies. The flavors are so intense, you don’t need to add much for them to be delicious. Eggplant, portobellos, zucchinis, sweet onions, red peppers, yum, and relatively healthy. They are easy because you can just drizzle them with olive oil, (or add a little thyme and minced garlic to the oil) and grill.
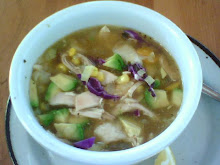
Well, as with every meal I prepare, I make enough for an army. So the next day, leftover grilled vegetables are delicious, but the day after that? Hmmm, not so much. I have had my fill and I hate to say it, but a lot goes to waste. UNTIL I remembered one of the basics lessons of the kitchen: the best way to utilize leftovers and scraps is SOUP! This soup is like a roasted gazpacho. It is hearty, satisfying, very flavorful, low calorie, vegetarian, vegan and Celiac disease (an allergy to gluten)-friendly…who wants some!? Now, depending on the veggies you use, the final product will vary, but I promise it will be a keeper!

Previously I gave a list of vegetables I use but here are a few other options: asparagus, cherry tomatoes or tomato slices, tomatillos or parboiled potatoes. Rough chop your grilled veggies, place in pot with tomato juice and/or chicken/vegetable broth, just to cover and heat over high until simmering. Reduce heat and slowly simmer for 20 minutes, stirring every once and a while so it doesn’t scorch on the bottom. Set up a blender and in batches, puree soup (carefully, it’s hot). Or if you have one, use an immersion blender and puree it all at once. If it’s too thick add more tomato juice or broth. And season as you go. In the end you will have a thick, robust, pureed soup. You can always add a bit of heat with some hot sauce or a bit of lemon juice or sherry vinegar to brighten the flavors. What about some lovely garnishes? I love diced avocado, caramelized shallots, croutons, sour cream or yogurt, basil infused olive oil, diced tomato, chopped cilantro or sliced scallions. And what would be better with this soup than a grilled cheese sandwich! Yes I totally think so! Hey, like it hot? Why not try it on a hot summery day as a cold soup? (Remember cold foods need more salt. So salt to taste!) Bon Appétit! Let me know how it goes. And I am taking requests. Please post any of your questions or comments!

P.S. If you aren't watching you weight, why not top your soup with parmesan, Gruyere, goat, really any cheese would be delightful!

Wednesday, January 27, 2010

Frittata Madness

Frittata is a delectable addition to any cook's repertoire. It is best described as a crustless quiche. Frittatas are easy and quick to make (under an hour), a terrific way to utilize leftovers, can be made sumptuously decadent, or on the healthier side (both will be the talk of the meal!) is best either hot or room temp and you can serve it for breakfast, lunch or dinner. Now, what other food can you say all those things about?
First, you are going to need a oven-proof, non-stick pan. If you are like me and want to live dangerously you can use a well seasoned cast iron skillet. (I am not what you would call a "risk taker" so the idea of my frittata sticking to my pan is totally living dangerously for me!) For a four serving frittata I use my 8-inch cast iron, with about 10 eggs and 1/2 -3/4 cup of heavy cream. Here is how to figure out how much egg mixture you will need: fill your pan about 3/4 of the way up with water. Next pour that water into a measuring cup and ta da! You will need that much! As far as the cream is concerned, it will depend on the size of your pan. Add enough so that the egg mix is a pale yellow, less if you are trying to keep it healthier, or more for utter richness! Now is the fun part: planning the yummy fillings. I usually like to have a protein (i.e. ham or bacon), veggies (potatoes, onions, spinach, etc.), cheese (feta, Jack, Gruyere) and some colorful garnish (green onions, sun dried tomatoes, cilantro). This is a great time to have that book I mentioned a few days ago (Culinary Artistry) to help you make perfect flavor combos. (For example if you have leftover sauteed zucchini, basil and goat cheese would make a phenomenal flavor match!) Heat your oven to 375 degrees. Heat your pan over medium, once hot, spray with Pam (I like to use spray oil because it makes it easier to oil the sides of the pan!) Pour in your egg mixture, put in all the fiillings, reserving the garnishes and cheese for the top (or not, do it how you think it will be best). Place frittata in the oven and cook for 20 minutes. After the 20 minutes, with pot holder in hand, shake the pan. The frittata is done when the eggs are set and there is just a slight wiggle in the center. At this time I like to remove my frittata because it will continue to cook (what we in the biz say, "cross over cook"). If you are squemish about jigglely eggs, feel free to cook it longer. But don't cook too long or your frittata will be dry and in some cases start to turn green (think of the yolk of an overcooked hard boiled egg, yuck) Once your frittata is cooked to your liking, remove from the oven and let it sit for 5-10 minutes. As your frittata cools the sides will pull away from the pan therefore making it easier to remove. When time to remove, shake your pan back and forth and it should slide out easily. If not, use a rubber spatula to help with any stubborn spots. Slice and enjoy. Serve with crusty bread and a salad!
Trying to watch your waistline? Substitute milk for the cream, Canadian bacon for real bacon, use low fat cheese and lots of veggies! Have fun with this recipe as there are no limits to what you can create.

Tuesday, January 26, 2010

Mahi Mahi tacos, redux

We enjoyed our fish tacos so much, we are having them again. Tonight my brother and his lady will be joining us for dinner. Once they have tasted our fantastic tacos they will surely be impressed!
In addition to having the corn salsa tonight (I think I will add some black beans this time!) I am going to make a chili verde sauce. What is chili verde, you ask? I believe, it is Spanish for green chile sauce. (Yup, I'm bilingual. Pretty awesome, eh?) This recipe consists of tomatillos (they look similar to green tomatoes, with papery husks), garlic, jalapeno and cilantro. Remove the papery husks from the tomatillos. You will notice the skin is a bit sticky, so I like to rinse them first in soapy water then in clean water. Next put halved tomatillos (about 1 pound) and 1 halved jalapeno, skin side up, on a cookie sheet and under the broiler set on high. Cook them until the skins blacken. This should take anywhere from 5-10 minutes, depending on the oven. Carefully put the hot tomatillos, pepper and any liquid that has accumulated in a blender, with about 1 handful of cilantro leaves, tender stems, 1 teaspoon minced garlic and puree. Don't forget to salt! Your chili verde sauce should be lovely green, with a tart peppery flavor.
I like to serve this sauce along side the corn salsa, or any chunky salsa because of the contrast in flavors and textures. It is excellent with fish because the tartness of the tomatillo is like a squeeze of lime or lemon! This tomatillo sauce is not just for tacos. Serve with chips, nachos, quesadillos, you get the point. Serve with chili rubbed flank steak or grilled chicken breasts. I also use this sauce as the base for my pork chili verde, which is another delectable dish. But I will save that for another day. I hope this finds you well and food inspired!I hope you have a fantastic Tuesday afternoon!

Monday Night, Fish Taco Night

Last night, instead of the usual ground beef tacos, we made Mahi Mahi tacos. I must say, they were damn good. My Dad grilled the fish to perfection (He has redeemed himself from past follies and can resume his role as Grill Man). The accouterments we served were fried corn tortillas (or you can heat them in a dry pan over medium heat) shredded red cabbage, avocado, sliced red onion, cilantro, Mexican crema (or use sour cream) and lime wedges. The Mahi Mahi was mild enough so that the tacos weren't overly fishy tasting, and had a nice tender texture. I made a corn salsa that paired nicely with the sweet, smokey fish.

Corn Salsa, makes about 1 1/2 cups
1 cup frozen corn
1/4 cup diced red onion
1/4 cup roasted red pepper (now you can buy these or make your own. Cut the pepper from around the stem and core (discard stem and core). Roast pepper pieces skin side down over a flame (or under the broiler) until black and put in a paper or plastic bag and let steam for 20 minutes. Remove peppers from the bag and peel off the charred skins. There you have it, roasted red pepper, from scratch!)
1 jalapeno, halved and roasted like red pepper
1 handful or cilantro ( the tender tops of the cilantro stems taste like the leaves, so I just tear off the leaves and any stems that come along), chopped
1/2 teaspoon garlic puree (for instructions, please check out Great Guacamole, not bad for a white girl)
Olive oil, fresh lime juice and salt to taste

Heat a skillet over high until smoking and throw in corn. You may be tempted to move the pan, but don't. You want the corn to get a bit black on the one side so leave it for two-three minutes. (Don't worry, because the corn is frozen the moisture will melt and prevent the corn from really burning). Once the corn is charred to your liking put it in a bowl. Add diced onion, minced jalapeno, diced red pepper, garlic puree and chopped cilantro. Squeeze juice from 1/2 lime (about 1 tablespoon) and drizzle the corn relish with enough olive oil (let's say, 2 tablespoons) so that each corn kernel is shiny. Sprinkle with salt and taste. What does it need? It should have a nice balance of sweetness and smokiness from the corn and peppers and heat from the jalapeno. The garlic, along with the lime and olive oil, shouldn't be overwhelming, just something that you taste on the periphery. As with guacamole, let the relish sit for an hour or so to let the flavors marry. Before you serve, taste to check the seasonings.

The fun thing about relishes and salsas is you can add and substitute a variety of ingredients. Why wouldn't black beans be a nice addition? If you don't like red peppers, add some diced tomatoes. Instead of red onions add some sliced scallions. Substitute the jalapeno for a few dashes of Chipotle Tabasco. Why not totally blow their minds? Leave out the corn and add diced mango. Now won't that go nicely with the sweetness of the Mahi Mahi? Have fun and remember, this cooking thing isn't rocket science!

Monday, January 25, 2010

Moving on

Yes, I am still recovering from my failed attempt at Shrimp Scampi. My HUGE mistake was trying to make it healthy with olive oil in place of the butter. It just wasn't going to satisfy my craving. Some foods you just cannot create a healthier version (like today I tried to make a turkey melt with dry toast, low fat Laughing Cow cheese and turkey! Yuck!) Some foods were made to be eaten with many calories!
So I am going to switch gears and write about something I also know a bit about: booze. More specifically, limoncello. In case you have never heard of limoncello it is a wonderful after dinner drink from Southern Italy. The first time I had it was in New York with my family. We were at an amazing Italian restaurant and our waiter, insisted that we try the in-house made limoncello. Now, we were all a bit buzzed on wine and thought he was bringing out dessert. To our surprise he brought out four frosty glasses filled with the pale yellow drink. The first sip was like nothing I had ever tasted. (Lemony sweetness, smooth and viscous, ice cold.) It was so good, we had another. When we returned home to SoCal my Dad sought out to recreate this delicious digestif. I watched as he spent hours carefully peeling the zest from a dozen organic lemons. Then, he mixed the zest with vodka, and let it sit for several weeks infusing it with it's color and flavor. After much anticipation, it was time to taste. My Dad was so excited, he was like a little kid on Christmas morning. We all eagerly stood around him as he he took the first sip then....he gagged! His labor of love was bitter. Although he had been careful to peel just the zest, a minuscule amount of white pith found it's way into the mix. It was ruined. Down the drain it went. After his failed attempt he tried several kinds from the store. As you can imagine, they were awful, the taste resembling very much what lemon cleanser smells like.

See, I have time on my hands, and lemons are plentiful at our local farmer's market (http://www.southcoastfarms.com/). With that damn cocky voice in my head nagging me, my friend and I along with Baby Julian decided we would give it a go. After a quick google search, I found a limoncello guru (http://limoncelloquest.com/limoncello-articles/how-to-make-limoncello). If you are interested in making your own limoncello, I suggest checking out this site. This guy has it down to a science. Aimee, Julian and I went to the market, picked out the best, smoothest looking lemons (total of 37), zested them with a Microplane and mixed them with Everclear. Vodka has a flavor that will affect the final product, while grain alcohol tastes like burning! (I don't know any other way to describe it! )

Now we let it rest for 45 days. Already the alcohol has turned bright yellow (my Dad saw it one day and asked why I was saving my urine...really?) and the zest's color has faded. The next step will be straining it and mixing in simple syrup then back to resting for another 45 days. But, by sometime mid March, I will be sipping on my ice cold, from scratch limoncello. And maybe if you are lucky, I will share!

Sunday, January 24, 2010

Shrimp Scampi, yeah no

Yes, I know. I promised a recipe for Shrimp Scampi. Well, prepare to be disappointed. There will be no recipe posted this fine evening because my scampi sucked. In fact, it was so bad I threw it out. What did I previously write about making mistakes? Learn from them. So, I must now go and reflect on what I did wrong....mostly I can blame it on the small amount of cockiness in my head that says, "Hey, I went to cooking school. I don't need a recipe." Yup this cocky part of me, many times let's me down. So the lesson? Don't listen to the cocky voice in your head. Or perhaps, don't have that glass of wine before preparing the evening meal.

Culinary Artistry

Hello my friends.
I was recently asked by a family friend how I came up with menu ideas. I told her, "Duh, I am a culinary genius! Ideas just pop into my mind!" Honest answer? No. Nope, I am not a genius chef, at best, a mediocre one, but nonetheless, fun right? Perhaps it is best I give thanks to The Culinary Institute of America and the many chefs I have had the honor and pleasure with whom to work . Without them I would not be the chef blogging before you. In addition to my education and work experience, I also must give, all the rest of the credit to my one go-to book: Culinary Artistry. (Available at www.amazon.com) I was first introduced to this book after I graduated from the CIA and was a teaching assistant for Certified Master Chef, Thomas Griffiths. This was a book he used as a resource. Now, I am a bit ashamed to admit this, but I haven't read it all. The part of the book I use the most has information that will inspire both the most or least experienced chefs! On these pages are listed the complimentary flavors and ingredients of general foods. For example, ingredients that pair with chicken are: almonds, apples, Armagnac, asparagus, bacon and it continues to list 80 other food items. It also gives the ideal preparation and cooking methods and tells you when that food item is in season. Now come on, with all that info given to you, how could you not come up with a delicious, blow their socks off meal? Find a quiet corner, pick an ingredient and in no time....BISTRO MENU! All created by you with your creativity and taste. Now, as with anything, at first you may be underconfident, but remember to keep it simple and you will do fine. Yes, you will make mistakes. In fact, I hope you do because it is the perfect time to learn. After each meal I have cooked, especially if it is something new, I like to sit back and critique it. I take note of what I liked, disliked and what I would do differently next time. This step will help you improve as a chef and I encourage you to make it a habit.
So to sum it up, buy Culinary Artistry ( http://www.amazon.com) and explore it. There are tons of pages of sample menus from famous chefs' restaurants that will open you mind to new flavor combos and applications. Tune in later tonight for a recipe for Shrimp Scampi!

Saturday, January 23, 2010

Homemade chicken stock

Anyone who knows me, will say I am a bit of a goodie goodie. I have always hated getting into trouble and have a nervousness about authority figures. If a cop is driving behind me, even if I am not speeding, have not done anything wrong, I still begin to sweat and feel guilty. Yup, that's messed up but that's me. So, you can imagine, I am not what you would call a "rebel". That is just not in my nature. I don't like to make waves and I like for everyone to get along. You must be thinking, what does this have to do with chicken stock? Nothing. Well it kind of does. Let me continue. I have discovered that when I do finally rebel, it is for really lame reasons. For example, I really poo poo what other chefs say are a "must do". You know, when they say, "Oh you MUST make your own mayonnaise! It is SOOO much better than store bought! It is SOOO worth the effort!" What do I say? No. I will buy Best Foods mayo and love eating every tablespoon. You can keep you damn fancy, hippie mayo! That is, until I worked at a place where, yup you guessed it, we made our own mayo. And to be true, it was AWWWESOME. Now I still bought Best Foods but every time I made it, I thought to myself, "Gosh, this really is way better and so worth the effort!" I cannot deny that. And that brings us to chicken stock. Homemade chicken stock is way better than the crap in the can. The canned chicken stock is pale and tastes more like celery and carrots than chicken. And what is equally annoying, is you really don't have any excuse not to make your own chicken stock, because it is SUPER EASY! (If you want to rebel against this, try me!) If you have a pot, water and a chicken carcass, you are well on your way to the golden deliciousness that is homemade chicken stock. That is really all I have to say about that. Really, put your chicken carcass or carcasses in a pot, cover with water, set over low heat and let it just chill out there all day. Within the first thirty minutes you will notice foam rising to the surface. These are impurities and you don't want to ingest those, do you? Skim the foam off and discard. This along with cooking your stock super slow over low heat will make it very clear. After six hours or so, remove the chicken bones and strain your stock. Now it may be a bit pale, so you can let it simmer for an hour or more til it gets stronger and deeper in color and flavor. You can make a stock pile (tee hee, no pun intended) of chicken bones in the freezer (like Julia Child says) and make one big pot of stock someday. Once it is to your liking, store over night in the fridge. The following day the chicken fat will have risen to the top and hardened. Remove fat and save in the freezer (for gravy or sauteing veggies?) or discard. If you don't plan on using your stock within a few days freeze until you do. Now how simple is that?

Soup Days

These cool blustery days are made for cooking. I feel fidgety and uneasy if I am not in the kitchen with something delicious bubbling away on the stove. I love making pureed vegetable soups, like mushroom and tomato, but today I am in the mood for something else. Today, I will make tortilla soup. This recipe is very simple and easy but with additional ingredients it becomes quite the hearty dish. This soup is good for a crowd because you can let everyone individualize their soup with garnishes. Also, if you are trying to watch your waist line, soups are a great option because you swallow air as you eat which fills your tummy faster! Here goes:

1/2 cup chopped onion
1 Tablespoon minced garlic
1/4 cup olive oil
sprinkle of salt, plus more to taste
4 cups chicken stock
28 oz can of crushed tomatoes
1/2 teaspoon Mexican oregano
1 1/2 cup frozen corn (you can use canned corn, but I find it tastes tinny. Yes, that is a bit snobby, I have been told that many times.)
tortilla chips (make it easy on yourself, store bought! See? I am not a complete snob)
1 cup shredded Jack and/or Cheddar cheese
1/2 cup chopped cilantro

Other garnishes:
diced red onion
sour cream
sliced avocado
lime wedges
shredded chicken (why not buy the pre-cooked chicks? I won't tell!)
minced jalapenos or serrano peppers
hot sauce

In a saucepan heat oil over medium heat. Add onion, stir frequently and cook until translucent. Next add minced garlic and a sprinkle of salt. After about a minute, add chicken stock and tomatoes. Crumble the Mexican oregano with your fingers and add that to your pot. Raise heat to high and once soup begins to simmer reduce to low heat. Let cook for 30-45 minutes. Taste and adjust seasoning, more salt no doubt. Add corn (and shredded chicken if you want) and cook until corn and chicken are heated through. Heat bowls in a low oven (why put hot soup in cold bowls?). Put some chips in the bottom of each bowl and ladle in soup. Sprinkle with cheese, cilantro and serve. Offer additional garnishes at the table. This should serve about 6 people very well!
I hope this warms and nourishes you. Let me know what you think! Thanks!

Friday, January 22, 2010

Typos

Oh my Lordie. I have been notified, with much disdain, that I have posted blogs with typos and improper punctuation. I am mortified, as I read and reread, and read yet another time, to make sure that I have everything PERFECT, and yet no, I need to read and look over my work yet another time. So I apologize and promise never to waste your time again with typos and misspellings (misspelled?) Thanks for all the support I have gotten! Hope you all enjoy my blog. I will update it daily if not a few times a day and please feel free to send me any questions or ideas. Have a safe and fun FRIDAY!

Thursday, January 21, 2010

Compound Butter, your new best friend

Good day Fellow Food Lovers. You might be thinking, what pray tell, is compound butter? If you guessed some kind of butter, you are correct! As defined by The Food Lover’s Handbook, a compound butter is “butter creamed with other ingredients such as herbs, wine, shallots and so on.”

Below I have given you some ideas about sweet and savory butters and ways you can use them. As always, these are my ideas. Use your culinary imagination and come up with new flavor combos and what you would use them for.

Sweet Flavor combos:


Honey ginger


Mini chocolate chips and orange zest


Maple syrup with toasted pecans


Cinnamon sugar


Dried cranberry with clove and sugar


Uses:
Spread on any breakfast breads (English muffins, toast, scones, biscuits, bagels, etc.), Pumpkin bread, pancakes, waffles, use to sauté sliced apples or bananas and serve hot over ice cream!

Savory Flavor combos:


Gorganzola (do you really need to add anything more than cheese and butter? Mmmmm)


Sun dried tomato with oregano (the best on top of grilled lamb chops)


Shallots and fines herbes (chives, parsley, chervil and tarragon)


Chile lime cilantro


Garlic with red pepper flakes and Romano cheese


Lemongrass and ginger


Pesto (basil, pinenuts, garlic and Parmesan)


Uses:
Where do I begin? Melt over popcorn, stir into pastas, soups, risottos, polenta/grits (fancy talk for corn meal mush), mashed, baked or roasted potatoes, tossed with hot green veggies, cooked with scrambled eggs, spread on any breakfast breads, slathered over a chicken (over and under the skin) just before you pop it in the oven. Melt over grilled steaks, lamb or pork chops. Why not sauté some shrimp or scallops in it? Or, melt some and serve with steamed lobster tails or any seafood of your choice, yummy!

Okay here are some hints to help you along the way:
Because I am a control freak, I use unsalted butter so that I can add the amount of salt to my liking.
Use SOFTENED, not melted butter (melted butter separates into milk solids and fat and while your end product will no doubt be delicious, it will be greasy and not nearly as pretty as it could be. Softened butter is a must!)
With anything you cook, sometimes the flavors need a little something to brighten them up. In this case, a squeeze of lemon, lime or a sprinkle of vinegar will do the job.
Once your butter is made, using plastic wrap, form the butter into a log and store in the freezer until it is time to use it. Your butter can be kept frozen for a few months. But you and your fans will love it so, it won’t last that long.

I have provided ideas and hopefully inspiration, but I have not given you recipes or ratios. Here is your challenge: Go forth and conquer compound butters! Be creative. Use my ideas or even better, come up with your own, but do go, experiment and have fun. Please post about your kitchen adventures and if you can bear to share, any ideas you have come up with.
Good Luck!

Great Guacamole, not bad for a white girl!


Okay first off, I am not the type to make overconfident statements about my abilities. I think that sort of confidence should be reserved for famous people…or at least people who are employed…oh and aren’t 30 and living with their parents.
But anyways, so when I say, “Yes my guacamole is AWWWESOME!” you know it must be true. Now it is delicious because I know my ingredients. I have been making guacamole for years because every Monday is Taco Night in my house. This is a tradition that started some 40 years ago in Munich, Germany. My father was in the army, my parents (newlyweds) every Monday would head to the Officer’s Club and crowd around the TV to watch NFL highlights and eat tacos made by one of the officer’s Mexican wife. And so the Miles’ family Monday Night Taco Night was born.
Okay, back to the best guacamole every created. I will share with you my secret to make the guacamole that will be raved over. Here is it: great avocados. If you have watery, pale, stringy or old avocados there is nothing you can do to make them taste palatable. But perfectly ripe, beautifully green, tender avocado flesh, mmm, I could eat it out of the skin with just salt! When I plan on making guacamole, I want it to be the best. I have no problem heading to Gelson’s and spending perhaps double what I would pay at another store, because I know they have the top of the line produce there. Once I have my avocados, all I need are fresh lime (or lemon), red onion, garlic, salt and cilantro. Other recipes call for tomatoes or jalapeno or serrano peppers but personally I like to keep it simple so you can taste each ingredient and aren’t overpowered by a bunch of flavors. Plus tomatoes can make the guacamole watery and not everyone like the spiciness from peppers.

Here is my fool proof, best in the west guacamole:

2 large avocados (I know I know, how the hell are you going to know what a “large avocado" looks like! Well look for ones 4 inches long. And it is ripe when the nubbin at the narrow end pops out)
½ lime (or lemon) plus more to taste
½ cup diced red onion
1 teaspoon garlic puree (I will explain later)
¼ teaspoon salt to start
¼ cup chopped cilantro
Okay let’s get down to the method.

1. Halve the avocados, remove the pits, spoon out the flesh and put in a bowl. Squeeze the juice of one half lime over the avocado and mash (with a fork, potato masher or my favorite, a dough cutter) until you get the texture you want. I like it somewhere between chunky and smooth.
2. This is going to be probably the trickiest part for you : the garlic paste. Now, I have experimented and have decided that I really don’t like minced or even garlic passed through a press because the pieces are just too big for my taste. Now don’t get me wrong, I love garlic, just not so much when I get a big chunk on my chip. So, start out by smashing a few garlic cloves with the side of your knife to remove the papery skins. With skins removed, smash cloves again. Mince the cloves until very small pieces form, don’t forget to clean the side of your knife where the garlic sticks. Once you have very small minced garlic sprinkle over the ¼ teaspoon salt. Again, using the side of you knife mash the garlic until it becomes a sticky paste. Take your time and don't rush, and certainly don't cut yourself. After a few minutes of mashing, Voila! Garlic paste! You are a real chef now! Add 1 teaspoon garlic paste (reserve any leftovers, as you may need to add more to your liking).
3. Dice your red onion, smallish or large if you dig and add to bowl. Chop cilantro, again, run your knife through a few times or seven times, to your liking.
4. Stir all the ingredients until even distributed. And the best part of the whole process…taste! Add any ingredients that your guacamole needs and serve with tortilla chips and chow down! (Now isn’t this nowhere near like that olive green, bird poop looking stuff they sell at the grocery?)

Like I have written before, recipes=guidelines. Cooking involves all senses, taste the most important, so if you aren’t a fan of cilantro (never read my blog again!) leave it out. Don’t like as much garlic? Add less. Make it taste good to you. Because in my mind, anything you eat should be worth the calories you are consuming, right? And a word on salt, one of its many properties is that it acts as a flavor enhancer. Salt to taste. Ask yourself: can you taste the garlic, lime, onion, and cilantro? Is it a nice balance or do you need more of one thing or the other? Also, as guacamole sits, the flavors have time to marry. Make it ahead of time and check the seasoning right before serving. Remember, lime juice not only adds flavor but it also prevents the avocado from discoloring. I recommend making your guacamole only a few hours ahead of time. If it has to sit longer, cover the surface of your guacamole with plastic wrap to keep it from oxidizing and turning an unappetizing color. Okay, a little troubleshooting here. What if you add too much of one thing? Ta da! Add another half of avocado, because more is better in this case and it will certainly get eaten!!

I hope you think my arrogance about my guacamole recipe is appropriate, more importantly I hope you enjoy your guacamole! Until next time!

A recipe: Just a Guideline

Depending on whether you have been cooking for years, or just starting out, I thought a good introduction would be about recipes. Recipes are this: Just GUIDELINES!
Whether the recipe was written by Rachel Ray, Emeril, Thomas Keller or some sweet old lady in upstate New York, you will not necessarily share the same tastes. Recipes can be modified to fit your palate. What if a recipe calls for garlic and you hate it? What if you really like a lot of citrus in your salad dressing? (Miss Jen!) Now, if you are just starting out cooking, look for recipes that you think you will like. As you gain confidence in the kitchen and with ingredients you will feel more comfortable experimenting. As one of my Chefs in cooking school said about ingredients, “Don’t be afraid, they’re not rocket fuel!” Have fun with it. And don’t worry about making mistakes, because sometimes the best, signature dishes are made when you make a gaff!
Another thing to keep in mind about recipes is that just with each person’s own palate, not all stove tops, and ovens are the same. Baking a loaf of bread in a recipe writer’s oven at 400 degrees for ten minutes might work for her. While other ovens may need to be up at 525 degrees and the loaf may need to cook for an additional thirty minutes. While preparing your meal, think about how your final product should taste like, look like and realize that you may have to modify cooking temperatures and times to ensure achieving your ideal final product.
Alright, another bit of a pet peeve of mine in recipes is when it calls for 1 medium onion. If you are just starting out cooking, how the hell are you going to know what a medium onion looks like? I am not sure I even know what a medium onion looks like. Equally annoying is when they ask for 4 garlic cloves. Have you noticed the cloves on the outside of a head of garlic, greatly varies from the ones on the inside? With these situations, experience is what comes in handy. Just take your time, breathe, relax, have a sip of wine. (Or two.) Use your instincts and remember: less is better than more, because you can always add but you can’t take away!
My last bit of advice about recipes, I take from Julia Childs. When a recipe calls for white wine, what do you use? Some overly oaky California Chardonnay you got as a gift last Christmas? (yuck!) I have always been told, do not cook with wine you would not drink (in my case, that doesn’t mean much, seeing I spent most of cooking school sipping on $5 bottles of Yellow Tail Shiraz, but that’s a story for another blog.) Anyways, Julia Childs says instead, use dry vermouth. You can get a decent bottle for $5 and I promise you will not notice a difference!

So, that is about all I have for you today. If you have any questions, comments or any topic suggestions please feel free to email me at: bmiles79@hotmail.com.
See you next time!
Happy Cooking